Saturday, October 29, 2011

Baby Class

So earlier this month we stopped by Crafty Planet in Northeast Minneapolis and my husband insisted that I take one of their classes, specifically "Baby 101:  Diapers, Bibs, and Burp Cloths."  I hesitated a bit, because I am already a bib-making maniac, but he thought I should crawl out of my cave and be more social.

So that's where I found myself last night, despite the fact that I felt a bit sickly.  There were a bunch of other first time expectant mothers in the class and one of them brought her mother.  We used The Nappies pattern for the diaper, the instructor gave us a bib pattern that she had created, and the burp cloth was made with a prefold diaper.

First things first:  Shopping.  I had grabbed some of my own materials on my way out of the house and since I rarely buy new fabric (mine all seems to be yard sold or thrifted), I took advantage of the class discount.  In addition to the fun fabrics below, I picked up some light blue flannel to make future diapers.  They also required us to use something called PUL, which is used as the waterproof lining of the diaper, so I bought that too.
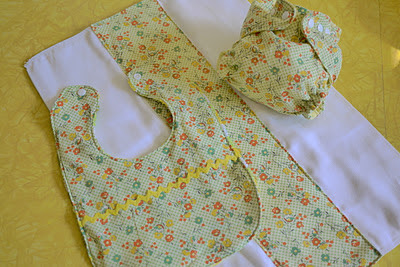
So for my projects, I used a vintage-y yellow fabric found at a yard sale by my mother.  
I used a yellow rosebud calico flannel for the lining and soaker pad of the diaper.  The soaker pad attaches via velcro and it's lined with two layers of cotton batting.  
I didn't want to do a bib with the flannel, so I brought one of my thrifted towels to the class.  All reports that I've had in from bib recipients indicate that the towel-backed bibs are the best for cleaning up after the kid and for preventing seepage through the layers.  I slipped in some ric-rac (or is it rick-rack?) before sewing the thing together.  
As for the burp cloth...we did not have enough time in class to do that, so I finished it at home this morning.  I bought a pack of prefold diapers and then took some of the coordinating fabric and just folded the edges over and sewed it onto the middle section of the diaper.  It feels a bit thick, but maybe that just means gross drool and vomit will not penetrate.  

So there you have it.  The class was good, instructor was super nice, and I'll probably go back for another class to continue on this fancy road to socialization (or just to get out of the house after the baby comes).  There's another fabric store a little closer to home called Treadle Yard Goods and they offer fun classes too.  I'm looking forward to someday taking one of their classes on how to recover an umbrella or how to make a roman shade.
Saturday, September 17, 2011

Ho Hum...Hems

We've been living in our new place for about six months and have only put up one set of curtains.  Instead, we have been living with all of our bits hanging out for the neighborhood to view.  A few months ago we went to Ikea and picked up five packages of Alvine Rund, a lovely sheer-ish curtain for our sunroom.  Five packages, you ask?  Yes, our sunroom has ten windows...hence the name sunroom.  
One dilemma to the sunroom...one bank of windows was something like over 150" long, so I had trouble finding the right kind of curtain rod.  I went with another Ikea product, some extend-o wire thing and clips to attach the curtains.  After purchasing all of the correct bits and pieces it would be another three months before anything went up.

Another dilemma...a long-ass radiator below another bank of windows.  That meant that I had to hem all of the curtain panels from 98" to 66".  Oh, what fun.  I first went all professional, weighted the one end of the curtain panel down (with heavy dog toys, but there's no photographic evidence, so maybe that actually didn't happen), marked everything, and then used all my handy-dandy tools to cut nice straight lines, but that took forever.  On the third panel, I said screw it and went with a true Sewer Slut-inspired method:
Clipping the top of the panel to a stripey rug.  Measuring out 69" (enough for a little hem) and deciding that the stripe at about 70" was close enough.  And then cutting along the stripe for the entire width of the curtain:
Phew.  I ended up only using seven of the ten curtain panels, which means I have three more panels to stick on some of the other bare windows in the house.  No rods though, which means I have to go measure (blah) and then go shopping (double blah).  I also have a pile of Alvine Rund remnants, so maybe I can figure out something to do with them.

Anyway, here are the end results for the sunroom...starting with a view through the doors:
And check out that vintage yellow pillow.  My mom picked it up at a yard sale and I fell in love with it when she gave it to me.  Here are two little close ups:


Friday, September 9, 2011

Eleflunk? I hope not!

My young neighbor is entering pre-school next week and to celebrate the occasion, I made her a new backpack to schlep all of her school supplies to and from home.  I bought this KwikSew pattern (#3687) about two years ago with the idea of making them for my best friend's kids.  I never got around to making anything from this pattern and by the time I showed it to my friend, she very kindly told me that her kids were a little too old for it already.  Oh well.

With my new neighbor in mind, I decided to actually do a little sewing for the first time in months.  Her colors are pink and pink and I really wanted to find a way to use them with the owl pattern.  After staring at all of the fabrics on hand, I just could not see any of them as an owl.  When my eye wandered over to a black and purple Asian fabric, I immediately thought of the elephant pattern.  The only problem with the elephant pattern, and the main reason why I was leaning toward the owl or the chicken, is that it is really hard to determine that it actually is an elephant.  

I went for it anyway and paired the black fabric (a remnant from Jo-Ann's) with some purple and black polka dots (yard sale fabric courtesy of my mom) and here is the result:
Not bad, right?  You can kind of tell it's an elephant with the trunk, floppy ear, and stringy tail.  Those little sticky-outy-things on the bottom are the straps tied through loops.  The inside is lined in the polka dot fabric.  And it has a little handle:

As for the pattern itself, it was pretty easy to sew.  The hardest part was turning the loops for the straps and the buttons, but KwikSew had a quick trick for turning narrow casings using a bobby pin...works much better than a safety pin.  They did try to get to me turn one casing with a needle, but I gave up on that after a prick or two and reverted to the bobby pin method.  And in my usual fashion, I topstitched everything!  They didn't tell me to, but the trunk, ears, and top flap each had a layer of fleece between the fabric layers and it just did not seem clean enough without the topstitching.  As for the buttons, one is used to secure the flap and the other is used as an elephant eyeball. 
As for her reaction?  Well, it was hard to tell.  I think she liked it...she kept putting it on her head and then she went into the kitchen and stuffed a bag of breadsticks in it.  She was also very curious as to why the elephant only had one eye and one ear, which I thought was pretty cute.

As a side note:  I am pleased to report that KwikSew seems to be based out of Minneapolis, MN, so that means I am supporting a local business now that I live in the Twin Cities.