Friday, December 25, 2009

Your Mission...

I have decided to make the world a better place and I have started with a one-woman war against Christmas fabric.  It's not like I plan to napalm fabric stores selling holly-laden bolts, but I do plan to rescue Christmas fabric from the sewing machines of others who intend to turn it into a tree skirt or a table runner or some country-time-lemonade Christmas quilt.  Yikes!

Instead, I am going to take Christmas fabric and use it to make gift bags!  Hah!  The idea all started last year when my mother gave me a yard and a half of holly/poinsettia fabric.  Ugh!  I politely thanked her, but inwardly cringed at the thought of contributing to a world already filled with too many holiday quilts.    After letting the yardage sit in the back of my fabric stash for a few months, I started to think about holiday gift bags.  Instead of wasting paper, I could create a pretty, reusable Christmas gift bag.

They were great!  I made about five bags using this pattern.  What a relief!  I was no longer burdened with Christmas fabric.  Little did I know that I would soon be given another half-yard of blue Christmas tree fabric.  Would this cycle never end?  Then, over the summer I happened upon an estate sale up the road from me. The little old lady had been a sewer and they were selling off her fabric! I found a few packages of Christmas fabric and immediately realized that I had a mission to complete:  I had to make more gift bags!

I gave away my last roll of wrapping paper and used handmade drawstring bags to package presents this year.  For gift tags, I cut up old Christmas cards and punched holes in them.


So, Sewer Sluts, your mission, should you choose to accept it, is to join me in this effort.  Rescue fabric from a pathetic fate as a table runner and make some gift bags!

Saturday, December 12, 2009

Artsy-Fartsy Kitchen

This piece of embroidery is heading out into the mail today.  My friend's birthday was yesterday, so hopefully she'll forgive me for being a day or two late.  I used another Sublime Stitching kit called Krazy Kitchen.  For the lettering, I looked on my computer and used a font called Musicals that I had previously downloaded from this site.  I then printed out the text, placed a piece of Dritz's wax-free tracing paper between the printout and the fabric, and traced the letters using a ball point pen.  They did not come out very clearly, so I then went over the tracing with a pencil.  I hope she likes it!!


Wednesday, December 9, 2009

Wedding Dress?

I want to wear a vintage dress at my wedding next year.  I intend to visit as many vintage clothing shops as I can.  I've already scoured the stores in Santa Cruz and those surrounding Cary, NC.  I'm sure a trip up to San Francisco is in order and perhaps a little jaunt over to Austin, TX, because I hear their vintage selection is pretty fabulous.

It's a crapshoot, I know, to go from rack to rack hoping that the perfect dress is hanging there without tears or stains.  I also have to hope that it fits or is a size or two too big, so that it can be altered.  I just don't want to get a cookie cutter dress from a bridal boutique, but I also realize that I may never find that one-of-a-kind dress, so I have a back-up plan:  I will make my dress.

I have checked on Etsy and other internet sites that specialize in vintage dress patterns.  I found some really fabulous ones, but they sell for big bucks.  Plus most of them have really tiny bust and waist measurements, which would mean that I would have to figure out how to re-size a pattern. (My brain hurts just thinking about that!) I don't think I want to spend $90.00 on just a pattern, so when I got a notice that some Vogue patterns were selling for $3.99 on their site, I went to the Vintage Vogue section and found my back-up dress:

It is an original 1955 pattern reprint.  If I actually end up making my dress, I think that I want to do the shorter version.  I love the long waist and the off-the-shoulder design of this pattern.  I'll have to find some fabulous fabric.  There's a discount fabric store not far from my home, so I'll probably have to start making frequent trips there, because their stock varies.  So what do you think?  Any thoughts or suggestions?  I'll probably do a dry-run of this dress pattern with some extra yardage I have just sitting around to make sure that it fits and that I can actually pull this off!  Wish me luck!

Sunday, December 6, 2009

Frame it!

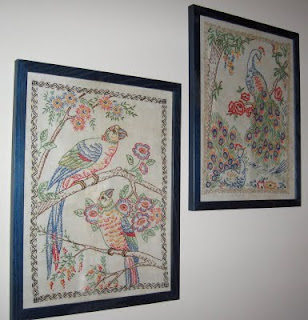
My mom is always trying to give me things when I go home for visits.  On my last visit, she went through her old stash of embroidery and showed me two bird embroidery samplers that she had completed over thirty years ago. I suggested that we get frames for them and hang them up in her house, but she insisted that I take them back to Santa Cruz and put them up on my wall.  So that is exactly what I have done:


(I had to take the pictures of them from a slight angle to prevent the flash from showing on the glass in the photo.)  I really love the way they look in the blue frames!

She also gave me two Japanese Geisha samplers.  One is completely finished and the other is not.  I need to work on the one and then decide whether I want to frame them or hang them from a ribbon.

Monday, November 23, 2009

You're Never Too Old For Barbies!

Ever since I was a little girl, making Barbie clothes out of my brother's socks from the mending basket, I have been fascinated by Barbie clothes. The years passed and Barbie was put away, but when I was nineteen I got sick and was out of commission for a bit. I had two young nieces and decided to start making clothes for their Barbies.  When I had two girls of my own, I continued to make additions to their Barbie wardrobes. To the right, is a dress I made about 35 years ago. I used a fabulous  metallic gold shag fabric, which over the years and after many hours of play by my daughters, has become a bit ragged.

Now that the kids are grown and out of the house, boredom has brought me back to my first love: Barbie. Now that little fingers can't destroy my handiwork, I can make fancy evening dresses with tiny embellishments. Too bad my eyes have not kept up with my desire to do the fine sewing so deserving of Barbie.

I love to search the remnant piles of fabric stores. I choose fabrics that have glitz and glimmer or fine detailed feminine prints. Another fun thing I like to do is layer one color over a another to make a unique creation. Enjoy the fashion show!

First up, we have Merrie Olde Barbie:

This dress always makes me think of Little Women or a Dickens novel.  I love the fur cuffs and collar.  She is only missing a fur hat!

Next up, we have Mermaid's Ball Gown.  The shimmery fabric is reminiscent of peacocks, but I always think of this when I imagine a mermaid crawling out of the sea and attending a fancy dress ball.


And let's not forget the Winter Fantasy dress.  The flecks of silver in the deep purple velvet have Barbie waltzing at midnight among the snowflakes.


Next, we want to wish Barbie a Happy Valentine's Day in this red lame and black tulle vision.


And finally, Evening in a Rose Garden, displays purple lace over teal satin with a row of roses along the back seam.  Barbie is definitely ready for a  night of stolen kisses with Prince Charming in a moonlit garden.


I hope you enjoyed this fashion show as much as we have.  Don't be afraid to let your inner child loose when sewing!

Monday, November 16, 2009

When Hobbies Collide

I took up roller derby a few months back and had to put most of my sewing projects on hold as a result of this new obsession.  I'm trying to sew as much as possible now and some recent creations suffer from being overrun by derby:

The Derbrarian Bag
Derbrarian, def:  a portmanteau (word, not luggage) which combines derby and librarian.  Our very own Sewer Slut, Susan N, also joined roller derby with me and, for her birthday at the beginning of this month, I decided to make her a derbrarian bag. Using the skills learned from my embroidery class, along with the Roller Derby and Sexy Librarians (+ Secretaries) patterns from Sublime Stitching, I created the following two-sided bag for Susan N:

I also lined the bag with some blue corduroy to cover up the ugly inside stitches and to give the bag a little bit more structure.

The Injury Apron
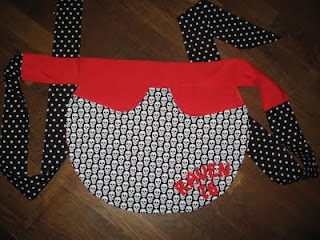
During a conversation with one of the players who had broken a leg during practice, we discovered that a solution to being confined to crutches or to one location in a house would be to wear an apron.  That way you can keep your phone, the remotes, a pen, your wallet, etc., all in one place without having to go search for them.  The apron has the added convenience of being attached to your waist, so that you do not have to deal with a purse or plastic bags attached to your crutches.    As a result of this conversation, I created the following personalized aprons for two injured players:


I think that Raven's name got lost a little bit with the busy skull print and I found that the red letters of Kiki's name didn't flow very well with the red bandanas on the pirate skulls, which is why I moved the letters to the waistband area.  The only downside with doing that, is that the reverse side of the apron is no longer pristine due to the red thread used to attach the letters.  Initially, I used Steam-a-Seam to attach the letters, but after multiple washings, I find that the letters on other projects just started to peel away from the fabric.  I wanted to secure the applique a little bit more, so I ran a blanket stitch all the way around the perimeter of the letters.

Raven's apron was delivered on Halloween in a post-surgery gift basket from the team. I'm a little late in delivering Kiki's apron, because she got her hard cast off last week, but she was on crutches yesterday, so hopefully she can still find it handy. I'll be delivering her apron later today!

Thursday, November 12, 2009

Tamer & Lion


I recently had a circus-themed party to attend and decided on the classic lion tamer and lion costume.  A lion was the only thing to which I could get Brian to agree.  It was, of course, not very original, because the party was rife with tamers and their animals, but instead of wearing the classic red, I went with blue, in part because it is our team color and also because I had a lot of blue yard-sale fabric sitting around.


For the Lion
I considered using the hood portion of a parka pattern, but after assembling that, I was really disappointed how it sat on the head.  The face was swallowed up by the hood.  Time was running out, so I just decided to sew a tube of fake fur and then I filled it with stuffing, and sewed some elastic between the two ends. I was still missing the beard part, because I had only made the tube long enough to reach the chin jaw line on both sides of the face. I cut out some approximation of a lion's beard and just hot glued it to the rest of the mane. I did sew and stuff some little ears and it was only after I had hot-glued them to the top of the mane that I realized I should have placed them closer to the face. As a result, I think the lion took on a wolf-like appearance. I also made a tail.  I sewed a long tube of flannel together and then sewed a little bit of the fake fur for the end.  To attach it to the belt I just made a little loop and put velcro on it.  None of the pictures show the tail, however, because Brian just looked too good in his vintage camel hair coat and the little tail was always hidden from view.  In addition, Brian thought the mane was too light of a color, so I took some brown fabric paint and some gold glitter glue and combed them through the fake fur.


For the Tamer
I used one of the classic slut-tastic Halloween patterns from Simplicity, specifically 3685, for which I probably paid $1.00 at one of those pattern super sales at JoAnn's. There were so many pieces to this jacket and I only had two nights to sew it up. I cut it out one night and then I sewed it together the next night. It probably took about three to four hours of non-stop sewing to put it together. I lined it with some silver fabric, which, once it was on, you could never see. I added some silver grommets and ribbon to tie it together. The only thing that I changed was the seam allowance on the arms. Fearing that my sausage arms would not fit into the sleeves, I reduced the seam allowance to 1/4". I wanted to make the vest, but ran out of time. I also wanted to bedazzle it with plastic crystals, but I also ran out of time.  As for the rest of the costume, I just wore a black feathered sweater tank and some booty shorts. Although I did not sew the hat, it was in need of some crafty magic.  They were only selling red, white, and gold hats down at the local lingerie store during their post-Halloween sale. I picked up a white one and took some mod-podge and reglittered it with silver glitter. I then took the selvedge from the blue fabric and hot glued a band of it all the way around the base of the top hat. I had also picked up a giant tickle-my-fancy blue feather at the lingerie store (because the craft store did not have the right colored plume) and I hot-glued that to the hat as well.

**Top photo courtsey of nocklebeast's Flickr page.

Wednesday, November 11, 2009

Doodle Embroidery Bag

In October I took a class at The Crafter's Studio in downtown Santa Cruz, CA.  It was a three-part class, with three classes each lasting three hours on Friday nights.  It turned out that there were only two of us who signed up:  me and my derby sister, Barbarian Librarian.

We started by doodling some ideas on paper and then transferring those doodles onto the front of our canvas bags with pencil.  I chose to do butterflies, because I am not an artist of any sort, and butterflies seemed like a pretty easy thing to sketch out.  Once I had two butterflies on my bag, I decided to add a dragon fly and a bumble bee.   As it turns out, I only ended up with the dragon fly.

Our instructor taught us a lot of simple stitches:  back stitch, stem stitch, split stitch, chain stitch, and the French knot.  I absolutely detested the chain stitch, because it just would not look like it was supposed to, so I ripped it out and gave up.  Our instructor also had a lot of books with samples of embroidery designs and stitches.  My favorite book, and the one I am considering adding to my collection of craft books, was called Stitch Sampler: The Ultimate Visual Dictionary to Over 200 Classic Stitches by Lucinda Ganderton.  The instructor also taught me the bullion stitch and the couching stitch, both of which were used to embellish my butterflies.

Along with the embroidery, the class also focused on how to construct an applique, which is something that I have been thinking of learning how to do for a while.  I chose to do a daisy that spanned both the front and back of the bag and attached it using the classic blanket stitch. After finishing up with the embroidery and the applique, we put a lining into the bag.  They had a serger at the Studio, so I actually serged the ends of my lining!  That was super exciting and it's too bad those sergers cost upwards of $1000!

So here is the final product:


And here are some close-ups of my butterflies.  The orange worm-looking stitch was the bullion stitch and the purple butterfly was made using a spiral couching stitch.


And finally, here is the back of the bag with the the other half of the daisy and the awesome snail fabric lining that they had at the Crafter's Studio:


I had a good time at this class and am considering some different classes for the future, but they don't involve sewing.  There's a jewelry making class where you learn soldering techniques...I hope we get one of those giant welding masks!  I am also considering a screen printing class and hopefully I can use those skills to make favors for next year's wedding.

Thursday, October 15, 2009

A Bit of Hand Sewing...


Hello!

I don't sew as often as I like, but one of the wonderfully relaxing projects I have been working on is hand sewing a skirt for faire. (Renaissance Faire, that is.) Hand sewing it makes the costume more authentic, and honestly, I prefer hand sewing because I find tedium soothing. Yes, you heard that right - I enjoy tedium, nit-picky details... Anyway - on to the project! You can see my cat above on the skirt. I'm not sure what it is about cats (or maybe it's just my cat?) but she must ALWAYS walk all over the fabric (and sit and lay down and... you get the idea). She had been somewhat broken of the habit by a former housemate of mine who would just give Pooka a sideways glance and she'd skitter off, but I guess her memory has waned from those days.

I did a general backstitch on four panels of fabric to make the skirt.


Now, I had already decided to make this a guinea pig skirt - as I wanted to try to find some way to sew up the ends so that after a zillion washings they don't fray all over. So I folded each end inward, and pinned the fabric.


I then hand sewed another back-stitch along the seam. This will all be on the inside of the skirt. I rather like how it's turned out, and I'm sure my washing machine will thank me as well. I haven't yet decided the best approach to doing the hem line on the bottom of the skirt and the top part of the skirt. It will be a bit tricker to figure out because I don't want the overlapping part of the seam to show... Regardless, this is what the finished inside seam looked like.


Thursday, October 8, 2009

It's a Crewel, Crewel World


Back in June, I stopped by Crafty Planet in Minneapolis, MN and found a crewel embroidery kit made by Wool & Hoop.  It was called "Love Loops" and the kit featured a way to make a greeting card, which I thought was really nifty.  But I had no embroidery skills under my belt.  I have lots of projects in mind and I've purchased a few of those Sublime Stitching packets, but have never really been motivated to actually sit down and embroider something.   However, when I turned the Wool & Hoop kit over, I discovered that the company is based out of Marfa, TX.  Marfa!  I was there for a wedding about a year ago this month.  Hmmmm... first year anniversary... paper... card...  Sounds like a good idea to commemorate the wedding with a kit from the actual wedding site!   So I picked up the kit and it sat on the shelf since June, until this past Sunday, when I realized that the actual anniversary was coming up over the Columbus Day weekend.  Uh oh!  So I got started and you can see the results of my hand stitching above.  I forgot to take a picture of the finished card, because I was so excited to have it done and ready to send off.  Instead, you can check out the examples at the Wool & Hoop site to get an idea of what it looked like.

I had a lot of fun doing this little bit of embroidery.  The kit only called for two stitches:  the satin stitch and the split stitch, but I know there are a lot of different little techniques out there.  And as it turns out, just looking at the satin stitch directions (yes, now, after completing the project!), I have noticed that I did it completely wrong!  Oh well, we all know my problem with following sewing pattern directions, so why should this surprise us?  Anyway, this is why I have signed up to take a three-part embroidery class.  They'll teach me all the stitches and I'll be more inspired to finish all these hand sewage projects I have waiting in the wings.

Saturday, September 19, 2009

Argh! Thank ye, SADU!

Thank you, SADU!  I absolutely adore my apron.  I love its old world pirate feel, especially with the print and color choices. I totally felt like a pirate today (did you talk like a pirate??) and, as you can see, I steered my ship in style!  I am also interested in the pattern.  Did you design this yourself or did you use a commercial pattern?  Please tell us more!  The pleats in the front are wonderful and I also really like the design of the waistband.

And don't forget SADU's cool wrapping with a wax seal and everything! Genius!


Saturday, September 12, 2009

Raw Sewage: Fabric

A friend gave me a yard and a half of this fabulous fabric this week.  She picked it up at a thrift store (yay!) in Felton, Ca.  I absolutely love it and can't decide what to do with it.  Should it become clothing or home decor??  Decisions, decisions...  I offered to make my friend a skirt, but she was insistent that I make something for myself.  Anyway, thank you, Nikki!! 

Friday, September 4, 2009

The Cap'n Bluebush Apron

My partner, Sewer Slut Mel, asked for an apron that was inspired by the pin-up pirate who was the hostess logo for our Pirate Apron Swap (and would a better name for the swap have been the "Yo Ho Ho! Apron Swap"?).  I tried to consider what elements from the hostess pirate would be best suited for an apron and I knew that I wanted to work a corset-like fixture into the apron and I wanted it to appear sort of like a one-piece pirate costume.  She could throw it on over jeans and still feel swashbuckly and piratey.

So I looked at my apron patterns and decided on the "Summertime Blues" apron designed by Joan K. Morris and  found in the A is for Apron book compiled by Nathalie Mornu.  I liked that the waist piece had the shape of a corset and that the bodice and skirt could pass as a dress.  So then I had to pick fabrics.  My mom made a pirate costume a while back and used a gorgeous cream and gold striped fabric that she later pawned off onto me.  I also had a nice, blue brocade-ish home dec fabric to use as the waist, so I decided that gold and blue would be the theme for this apron.

The first hurdle whenever one uses a pattern from this book is the fact that it needs to be enlarged.  No problem, right?  I had made two other aprons from A is for Apron and that was not a problem, because they each had maybe one to three pieces to enlarge.  Not so with this apron.  There were fourteen pieces to enlarge!  I could not remember how much the blueprint place charged and I was so gung-ho to use this pattern, that I just went and got them enlarged.  Yikes!  The bill was way too much for what an apron should cost.  I will definitely think again before enlarging multiple pattern pieces at the blueprint place.  Should I have considered this as an omen?  A curse by a witch of the high seas?  I was blinded by the booty under the X and so I plundered ahead with this apron.

So everything gets cut out and the first problem that I encountered was that the bodice pieces were not marked very well.  I needed to sew together the bodice edgings to the bodice pieces.  By sheer luck, I matched the first one correctly, but then I accidentally sewed the wrong edges together on the second piece and only figured it out after I had clipped the curves. Grrrrr. This really should have been marked in a more comprehensive manner. Continuing with the bodice, I pinned the lining pieces to the front and found that they did not match up evenly at all and I had to cut about an inch off from the shoulder to make them fit together. Also, when attaching the ties to the shoulders there were no marks to match up and that was also a bit of a pain.

For the most part, I was able to assemble the skirt pieces without issue, with the exception that the bottom layer was at least three inches longer than the pieces above it.  How did that happen?  I did a bit of a pleat and it all came together.  After they were assembled, I looked at the reverse side of the skirt and I was really disgusted that the instructions did not call for this to be lined.  Without a lining, we were looking at at least four ragged seams.  Not pretty.  So I cut out a bit of a lining and sewed it to the skirt.  There were three layers on the bottom and I only cut the lining to the second layer, because the third layer was a gold mesh that I wanted to leave exposed.
  

As I went to assemble the skirt to the waist, I realized that my waist piece was too short.  Ridiculous!  So I had to sew a little extra blue brocade patch onto the waist in order to make the skirt fit.  Argh!  So far this apron is on its way to walkin' the plank!

After the apron was all assembled, I just needed to install the gold grommets, some navy lace on the neck line, and I really needed to figure out what to do with that gold mesh.  The mesh was really pretty and with a straight hem, the apron really seemed too Renaissance-y to me, so I started chopping away with my scissors and gave it that jagged look of a pirate lass who's been wearing the same outfit for way too long on a trans-Atlantic voyage!  

After the navy lace was sewn onto the bodice, I decided that I needed to iron it just a bit and my iron was a tad too hot and the lace melted somewhat.  (Mel, you can see it if you really look, so don't look!!)  Otherwise, I think that is it.  Sewer Slut Susan talked me out of attaching bells to the apron...she thought it looked to court jester-ish and she was right, though it sounded really neat to jingle when I walked.  And so here you have it, Cap'n Bluebush's long lost apron:
I hope she likes it!  I also hope she enjoys the scurvy-preventing recipes that I included.  Argh!  And happy pirate sewing!

P.S. While typing this post, I started looking up reviews of this book on Amazon and a lot of people said the same thing about pattern pieces not fitting together properly or that the directions were poorly written.  I made "Deep Pockets" and "Twirl Girl" from this book and do not remember any major snafus (and you can view the results of these two aprons in our slideshow to the right).  This is the first apron that I have had trouble with, but I am definitely going to check reviews before I make another one.

Wednesday, September 2, 2009

Argh! Ye Sewer Sluts!

Here is a preview of the apron I sent off today to a Sewer Slut Swapper.  I can't wait for her to receive it so that I can show the full pic!

Don't forget to send the apron to your partner by 9/5...that's coming right up!  Please share pics of your finished work on the blog once your partner has received the apron.  Likewise, the person receiving the apron can also share pics of it.

Argh!  Looking forward to photos of all those sexy, creative aprons that only a pirate lass would wear!

Sunday, August 23, 2009

Rah Rah! Go Harbor Hellcats!

In June, Sewer Slut Susan N. and I went to our first Santa Cruz Derby Girls (SCDG) bout. It was such a close match between SCDG and the Jet City Roller Girls of Washington and we lost by about four points. Total bummer. Besides sparking an acute interest in roller derby (so much so that we are now in training as SCDG Fresh Meat), we also noticed that the bouts had themes. That night in June was a Hula-themed bout and people (mostly bout helpers) were dressed in grass skirts, coconut bras, etc. Mmmmm.....costumes.... The program indicated that the next bout would be Tutu Army, so Susan N. and I went out and bought tutus. For last night, our third bout, the theme was Black & Blue. Black & Blue? What do you do with that? So we started brainstorming and came up with Black & Blue Cheerleaders, which sent me on a quest for a pattern.

I searched high and low for a good cheerleader pattern. I could have sworn that Simplicity or McCall's had one in their costume section, but nothing popped out in any of my searches. So I started expanding my quest and came across a random auction site with a vintage 1971 Simplicity pattern. I ordered it with a whole month between my purchase date and the bout. Plenty of time to whip up something fabulous, right? Well, the seller took her sweet time sending me the pattern and I only received it this past Monday...a mere FIVE days before the bout! Grrrrrrr. The pattern was cut, but intact. The previous owner had done the long-sleeved variation. I chose to do View 3, the blue and yellow cheer outfit with the varsity letter. I purchased some blue costume satin and black fabric with little white skulls for the inserts.

This was a really fun costume to sew, though I loathe sewing on satin, because of its tendency to pucker slightly at times. I have never put in a godet before (those are the little inserts in the skirt) and it was really easy. I love how those little white skulls contrasted with the bright blue of the rest of the outfit! I decided to skip the lining and just sewed a hem, because a.) I did not buy any lining fabric and b.) I was running out of time!

I was a little wary of the sizing of the costume (I figured it would be too small) and as I slipped it over my head for the first time I realized that it was just slightly too big. Whew. That is easier to fix. The only problem was that the neck was way too high and tight and the shoulders were too big. Hmmmm. So I decided to cut some of the neck away, which then changed how the pattern facing would attach. I figured the best bet at this point would be to just bind the neck with some white bias tape. After that was done, I tried the costume on again and realized that by changing the neckline, the dress had become too droopy in front. Grrrrrrr. I did not want to risk messing up the shoulder construction with more happy scissors action, so I put in the shoulder facings as instructed, but to fix the sizing and droopiness of the dress, I made little ties for the shoulders. (Thanks Susan N. for that brilliant suggestion.) There was one other thing I did not like about the fitting of this dress and that was the fact that you could not see the little godet things. Well, I did have that tutu.... So I wore my tutu/crinoline under the costume and it was transformed! And did I mention the best little finishing touch? Instead of a varsity letter, I went to a local Santa Cruz head shop and found a little black and white skull & crossbones patch. Yay!
And here we are together in full cheerleader regalia. Here you can also see the shoulder ties that I made and a better close-up of the skull patch.
And what is the next bout's theme? Superheroes! My costume is mostly complete...I just need a cape and some red tights.

Monday, August 10, 2009

Diaper Bag is Possessed by Sewing Gremlins

After all is said and done, my sister's diaper bag turned out to be a pretty snazzy specimen. Getting to the snazzy part, though, was quite turbulent.


After perusing pattern after pattern on the internet, I settled on Butterick B5005, View C. I used an upholstery remnant purchased at Hart's for the outer layer and a blue poly-cotton yard sale find for the inner layer (all part of catering to my sister's love of Reduce-Reuse-Recycle). I opted out of the optional iron-on vinyl coating and also ended up opting out of the interfacing. Now that I think about it, I think those pesky Gremlins showed up when I purchased the interfacing.


The pattern calls for something called "hair canvas" to be used for interfacing. Hair canvas? Never heard of such a thing and neither, apparently, had the clerk at Hart's. She directed me to some very heavyweight normal-looking interfacing. We both agreed to try it and she cut me the required 2 1/8 yards. While I was looking for the handle webbing, she came over with the bolt, looking a bit flustered, and showed me the price--a whopping $12.99 a yard! She had no idea and then said, "Well, I've already cut it..." Oh well. Turns out this was not even the sew-in type of interfacing that I needed, but some sort of double sided fusible thing. Ugh. I decided to cut it up and sew it in anyway. After about the third panel, I realized that this stuff was going to make the bag really stiff. Not to mention the fact that I would have to sew through all of these super thick layers, so I ripped the stitches from everything but the bottom panel. I did not want to use the recommended cardboard lining for the bottom of the bag, so I figured that this stuff would make a decent substitute.


So everything was going along quite smoothly with this bag and I kept scoffing at the one review that I had found of this pattern. Obviously that lady was not a Sewer Slut! And then I got to the point where the lining and the outer layer get sewn together. With right sides kissing, I sewed all the way around the perimeter of the bag. Then I turned it only to find that I had not turned the zipper facing toward the outside of the lining and it was now stuck between the two layers. Rip. Rip. Rip.


Okay, so let's try that again. Pin pin. Sew sew. Turn. Looks good. Let's zip it up. What's this? The zipper is UPSIDE DOWN? For about a full thirty seconds the only thing I kept saying was "Seriously? Seriously?" This was the last thing I did last night. It was 10:00 p.m. and I thought I would wake up and give it a fresh start. Then this morning, I decided that the best thing to do would be to just rip out the zipper, turn it around and sew it back in. I got about three inches into my seam ripping when I realized the folly of my thinking. This would be a near impossible task. It took me about 20 minutes just to sew up those three inches, so can you imagine how long it would have taken to re-sew the entire thing?


I turned the bag inside-out again, ripped the seams, flipped the zipper facing and sewed it up. It worked! Hah! Take that, Gremlins! I finished it up with some top-stitching, instead of understitching (because I still can't remember what that is!). It looks pretty good. What do you think:


And here it is filled with baby goodness. Looks like there's still space for some more things...

Overall, the bag is really nice. It could use a tad bit more support (curse you, hair canvas!) and slightly clearer directions. Or perhaps, I just need to follow them better. Case in point: At one point the directions wanted me to clip to small dots after sewing the pockets onto the lining. I looked at those directions and looked at the lining and thought, "Now why would I do a stupid thing like that?" Then I got to the point where I needed to sew it onto the bottom lining and realized that I actually did need to clip it. Ugh. Perhaps the problem with the zipper was the same. Perhaps I just ignored the step that said match circles or squares...I refuse to go back and check.

Sunday, August 2, 2009

Bibbity Boppity Boo!


In less than two weeks I will be in Florida for my sister's baby shower and I am frantically trying to finish all of these baby projects. This week's conversation with my sister revealed that she has ten bibs already and thinks more than that will be unnecessary and excessive. Hmmmm...I don't know about ya'll, but I'm pretty sure ten bibs will not be enough.

So I whipped out Sweet Booties again and enlarged three different bib patterns at the blueprint place. The three patterns of choice were "On the Town" (pg. 68) which features a boy bib with an applique tie and a girl bib with an applique necklace (I just used the pattern for the bib and ignored the applique; the bib from "Patchwork Set" (pg. 75) sans patchwork; and the bib from "Too Too Fun" (pg. 100) minus the tutu and slippers. I also chose as many different fun, kid-print fabrics from my stash and came away with sharks, watermelons, ladybugs, trains (courtesy of Slut Feed Dog), Spider Frog, zoo animals, plaids and stripes. For the suggested terry cloth linings I used old towels and I used snaps or hook-n-loop tape (a.k.a. velcro!) for the closures. I made her nine bibs, three from each pattern.


These were simple to make and I had a lot of fun choosing the different prints. I found more towels at a yard sale yesterday, so I think I'll use those with the remaining fabric to make some burpies (she only has a dozen of those--using the same logic as the bibs). I also have to make her the diaper bag and she also asked for a hooter hider for when she's nursing or pumping. Ack! More baby projects!!!!