Tuesday, December 21, 2010

Stuff This

Years and years and years ago my mother made us felt Christmas stockings from kits.

They've definitely seen better days, but they are such wonderful little heirloom pieces.  You can find the old kits on eBay, but the prices seem really excessive....$20.00 to $60.00 or so for one of these kits.  I haven't seen mine for sale, but my sister's stocking was made by Sultana and was called "Mini-Toys".  There was one for sale on Etsy, but it's since been sold. 

Given the major price gouging on these little felt applique kits, you can imagine my surprise when I came across a kit at a yard sale a while back for $4.00.  It was a vintage kit by Bucilla (#82065) called "On Santa's Knee" and I decided to make it for my newborn nephew.  I started it earlier this year, but found it to be too time consuming and tedious.  I didn't have the patience for it, so I set it aside for a number of months.

Then in October my mother showed up for the wedding with her usual haul of yard sale finds.  Among her goods, she had found two additional felt applique kits.  One was a vintage kit from Sultana (#1249) called "Jack-in-the-Box" and the other was a kit from 2001 by Dimensions (#8092).   So after the wedding, I dragged out the Bucilla kit and started to stitch away.  I had just over two months to get these three stockings prepared for the kids in my sister's family.

The kits are pretty neat.  They come with everything pre-printed on sheets of colored felt that you cut out.  You start with piece 1, attach piece 2, then piece 3 etc.  The kits come with detailed instructions, coordinating embroidery thread, crewel thread, sequins, and needles, but they don't come with stuffing.  The hardest part was attaching each little sequin and bead.  It took forever!
You can see the pre-printed outlines in this mid-assembly photo.  And P.S. that is Santa's bag, not a golden toilet, which is what my husband kept calling it.

I dragged the Jack-in-the-Box kit down to Southern California for the Thanksgiving weekend and spent about six hours straight working on it on the drive back home.  I started the third stocking during the first week of December and finally finished it late last week.  I have seriously been working on these stockings for about eight weeks non-stop in the evenings while watching television and movies.  And so, here they are:
Only the Sultana stocking came with a bell, so I added bells to all the others.  I mean, seriously, you really need a bell on Christmas stockings.  How else will you know if pudgy little kid arms are illegally rooting around in them?
I modified just a few things on this Santa stocking from Bucilla.  The little stuffed bear is supposed to be attached with velcro, but curious kids will definitely find cause to remove him and then lose him, so I stitched the little bugger on.  I was supposed to use a gold cording for the name, but Mr. Parker is a String Burglar and kept making off with it and I couldn't figure out how to balance out the letters in cursive.
This Sultana kit was slightly easier than the Bucilla, either because there were fewer pieces or I had become a pro.  I modified just a few things on this one too.  I stuffed the head and body of Jack, because my stitching was a bit wonky and the stuffing helped hide that.  In true 1970's fashion, they wanted me to attach red sequins to the pink ornaments, but the colors did not look that good in the photo, so I opted for white on the one and light blue sequins on the other.  I love how the ornaments swing!

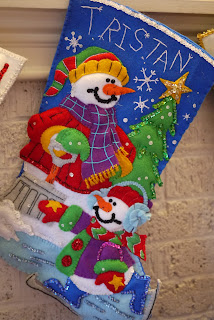
You can tell that this one is the modern one, just from the color scheme.  All that vibrant blue!  None of the vintage kits really have that color.  This one also has a few modifications.  I inadvertently attached white sequins along the top when it had called for blue.  I used black sequins for the mouth and eyes...the recommended black stitching did not look much like coal.  The cursive stitched name that the directions recommended looked stupid, so I gave it my own letters instead.  This kit wanted me to stuff almost every single applique piece...ridiculous!  I just did the ones that I thought needed some dimension.  It came with purple sequins, but never said to use them, so I outlined one arm.  I also scratched the pom-poms that were supposed to appear on the hats.  

My sister's husband is the only one who doesn't have a stocking, so I guess I know what I'm doing next year.

Friday, December 3, 2010

Book Haul

The Barbarian Librarian clued me in to a holiday promotion by Chronicle Books.  All I had to do was come up with a wish list of books from Chronicle totaling up to $500.00, blog about it, and then I'd be entered to win the list and a lucky blog commenter could win it too.  I made it to $497.84...whew!

Sewing Books
  1. Applique Your Way by Katye Taylor - I love applique!
  2. The Sock Monkey & Friends Kit by Samantha Fisher and Cary Lane - With a niece and nephews on the way and years of present-making ahead of me, I'd say this one is a winner!
  3. 1, 2, 3 Sew by Ellen Luckett Baker - Projects in groups of three.
  4. Girl's World by Jennifer Paganelli - I mentioned that niece, right?
  5. Whip Up Mini Quilts by Kathleen Ricketson - Someday I will make a quilt, so should start with a mini one.
  6. Simple Sewing by Lotta Jansdotter - Fun!
  7. Simple Sewing for Baby by Lotta Jansdotter - One niece comes out tomorrow, one nephew comes out on the 7th...better get sewing!
  8. French General: Home Sewn by Kaari Meng - The author "scours the French countryside and Parisian fleamarkets for vintage treasures."  Um, SOLD!
  9. The Pillow Book by Shannon Okey - This was going to be the name of my erotic bookstore, but maybe I'll just make pillows instead of pursuing that dream.
  10. In Stitches by Amy Butler - Amy Butler; still not convinced that I like her stuff.
  11. Kyuuto! Japanese Crafts: Fuzzy Felted Friends - I love Japanese crafts!


Embroidery
  1. Embroidered Effects by Jenny Hart - I love Sublime Stitching.
  2. Kyuuto! Japanese Crafts:  Wooly Embroidery -  My embroidery class used this book as an example of good techniques and projects.
Knitting & Crochet
  1. Field Guide to Knitting by Jackie Pawlowski - Someday I will learn to knit.
  2. The Sock Knitting Kit by Alyce Benevides and Jacqueline Milles - And then I will knit socks.
  3. Creepy Cute Crochet by Christen Haden - And when I learn to crochet, I'm making monsters.
  4. Kyuuto! Japanese Crafts:  Lacy Crochet! - I love this Kyuuto! series.
In the Kitchen
I like to make aprons, so here are some food-related books
  1. Cake Pops by Bakerella - I don't know if I'd do anything more than gaze longingly at each picture.
  2. Yum-Yum Bento Box by Crystal Watanabe and Maki Ogawa - No patience for the execution of ornate bento boxes, but I love staring at the photos.
  3. Farmers' Market Desserts by Jennie Schacht - Yummy!
  4. Fresh from the Farmers' Market by Janet Fletcher - I suppose I just can't eat dessert all the time.
  5. Let's Cook Japanese Food by Amy Kaneko - I love Japanese home cooking.
  6. Crepes by Lou Seibert Pappas - With nutella, I hope.

And just because I love vintage, crafts, and vintage crafts, I am including Vintage Craft Workshop by Cathy Callahan, which will be available in February 2011.

Sunday, October 24, 2010

Elizabeth Bennett: Zombie Hunter

Zombie or vampire?  These were my options for last night's themed event of "Zombie vs. Vampires".  Last year, I went as a nasty zombified prom queen, complete with rotted flesh made with liquid latex, which smells incredibly similar to Parker's cat box.  Not wishing to douse myself in urine for the second year in a row and also realizing that I have no recollection of ever wanting to dress as a vampire in my 34 years of life, I decided to try something a bit different.

I already had pattern 4055 from Simplicity's historical collection.  This pattern covers the 1795 to 1825 period and the small print reads "Sense & Sensibility Patterns."  Perfect for an interpretation of that Pride and Prejudice and Zombies book that came out last year.  Admittedly, while I have not read this mash-up of Jane Austen's classic, I have read the original and feel more inclined as a zombie hunter than as a gross and hideous undead creature.

So I whipped up this dress over the course of a week, putting the final touches on it just hours before the event.  The overall fit of the pattern was pretty good, though I had to sew the bust with a smaller seam allowance to accommodate my heaving bosom.  I chose a heavy light green fabric for the dress (six yards of it were picked up at a yard sale last year!) and the overlay was from the remnants pile at Beverly's.  Here are some close-ups of the details:
The buttons on the back are just plastic from my stash and the white is a bit too harsh, but I didn't see the point in buying anything I didn't have to for a costume. 
I tried out the scallop stitch on my sewing machine for the hem of the overlay.  The pattern suggested a narrow hem, but I wanted to use a darker green scallop to give the dress a little bit more decoration and to match the braid at the neckline.  Speaking of which...
I sort of love how the sleeve just slightly slips from the shoulder.  It totally reminds me of all of the Regency Romance novels that I love to read.  I mean, can't you just imagine Mr. Darcy getting a bit too friendly with Miss Bennett, pulling the sleeve from her shoulder to place a very improper and daring kiss?  Um, yes please!
And here I am about to chop the head off of the zombie Walt Whitman.  

Tuesday, October 12, 2010

Wedding Baggage

It was getting down to the wire and I had not sewn anything for my wedding.  I mean, what kind of Sewer Slut would I be if I didn't handcraft some fabulous fabric item for my very own wedding?  My dress was vintage and, though I did not create it myself, I did reinforce the beading, but that doesn't really count as making something new and unique for the wedding.  I kept trying to think of little things to make with needle and thread for the ceremony...did people need little fabric flags to wave or what about fabric flags lining the path to the ceremony?

Weeks ago I decided that I would need a garment bag for my dress.  I already had the pattern, Butterick B4156, which seems to now be out of print.   I also chose the fabric...a gorgeous vintage print from my new sister-in-law.  So I set both the pattern and the fabric aside, but did not touch them for weeks.  I spent my time crafting paper flowers for the centerpieces and just ignored my sewing machine for the month before the wedding.  

So Friday morning at 5:30, I woke up and made the garment bag.  With three panels of fabric, a zipper, and loads of bias tape, I figured that it would take about two hours and that was all the time I would have to myself until after the wedding.  And I was right...it was about two hours on the nose.  I got a bit exuberant about ripping out basting stitches, so that I now have a small bit of bias tape to repair, but otherwise the bag is fabulous!

And here we are...

Saturday, September 18, 2010

Sewing Stuff from Japan

I thought that I would come home with suitcases packed with yards (or meters!) of Japanese fabrics,  notions and books, but I came home with very little evidence of my trip to Japan.  I don't know why.  I thought I had done the right research, but I either missed the crafting stores as a result of sensory overload or I was just too tired at the end of the day (which is when we usually had time for shopping) to really focus on looking for them.

I did a little research before going and printed out a map of Nippori's Sen-i-Gai (Fabric Town) in Tokyo from this site.  I dragged Brian there after a day trip to Nikko.  We arrived around 4:15 in the afternoon, which was not the best time to go shopping in this district, because most places seemed determined to close at 5:00.  It seemed to be a wholesale district and I didn't see any cute stores, though we did happen upon a notions branch of Tomato.

Tomato was packed with young squealing girls who spent time salivating over adorable buttons and ribbons.  This girl squealed at this display of zippers:
Lacey zippers!  How fun are they?  I should have grabbed a bunch in every color, but I only picked up one each in pink, red, and black.  I'm not quite sure how to attach them, but I'll figure it out.

I didn't really find any other craft stores or fabric stores (though there was a nice section at Tokyu Hands), but I did happen upon these at a sock shop and I think I should only be allowed to wear them when sewing:
As for books, I spent a good hour perusing the sewing/craft section at Kinokuniya, but walked away without a thing.  I finally found a good embroidery book at Narita Airport.  I haven't translated the author's name yet, but the book is called "12 Stitches Idea" and it's pretty fabulous.
 I really fell in love with this shirt.  So adorable.  They also suggest doing this on a piece of ribbon for your own homemade measuring tape.
I also really liked these coasters:
Maybe I'll have better luck next time.  Brian has agreed to at least one more trip to Japan and only if we go see Kyoto.  He also kept asking how far away Miyajima was from Tokyo, so I think we'll have to do a Kyoto-Hiroshima-Miyajima excursion someday.

Monday, September 6, 2010

Reversible Japan

Prior to going on my ten day trip to Japan, I made a reversible skirt from Betz White's Sewing Green with the idea that two-skirts-in-one equalled less packing.  While that was true, it was also devastatingly hot and humid in Japan and this double layered skirt was maybe not the smartest thing to pack.  In addition, the humidity caused some major thigh chafage on that first day and I had to go out and buy some leggings to wear under all my skirts for the rest of the trip.  I was basically walking around with about two to three layers of fabric on my bottom half for the entire time in Japan.  Yikes!

Anyway,  I think Betz White makes her skirt with a vintage tablecloth in the book.  I chose to use a piece of fabric that a friend gave me last summer.  I had just enough of the fabric to cut out the required seven panels for the skirt.  Here is the first side of the skirt at Osore-zan, or Mount Dread, the third most sacred spot in Japan.
And for the reverse, I chose a piece of muslin that I had in my sewing cabinet.  I was afraid that a white cotton would be too thin and the other side would show through too much.  I also embellished the plain side with some Steam-a-Seam flowers from the print fabric.  I didn't have enough to go all around the hem, so I just did the first panel or so in the front.  Here is the reverse at two different hilside shrines in Kamakura:
As for the pattern, it was pretty good, with the exception of the length of ribbon needed for the waistband.  I needed an extra yard to feel comfortable tying the skirt at the waist.  I'm not a huge fan of reversible skirts (mostly because they never stay shut and the waistband always feels weird), but I like this skirt.  I'm glad I finally got to use that fabulous floral fabric!  Thanks again, Sookie!

Sunday, August 22, 2010

Whipped up Wallet


In just a few days I'll be traveling to Japan.  It's been about nine or ten years since I was last there, so I'm pretty excited to return for a full ten days of temple hopping, people watching, and mountain climbing.  To commemorate my trip, I decided to whip up a wallet that actually fits my passport.  You also walk around with a lot of coins in Japan, so this has a nice sized change pocket, which will come in handy.

I chose the "A Girl's Best Friend" wallet from Jenna Lou Designs.  I picked this up in Minneapolis last year, but never got around to making it.  And I had just enough of this fabulous vintage remnant to make the wallet.
It was pretty easy to construct.  According to her website, there was a misprint in the instructions, but I didn't have any trouble fitting the whole thing together.  I wish that I'd used fusible interfacing, but I couldn't find any in my sewing cabinet and was too lazy to go buy some.  I probably should have used a snap instead of velcro, but the velcro will work just fine.

Friday, August 20, 2010

Oh Buttons!

A few weekends ago I stopped by the Sunday Antique Street Faire and picked up some buttons from one of the vendors.
Ocean Pearl by Schwanda
Also by Schwanda...Made in Germany.
More Schwanda buttons...Made in Western Germany.
Just some shiny blue ones.
And then there are the buttons I already have in my stash.  These all came from my mom's collection, which she generously donated to mine.
Le Chic hand painted glass buttons.  The card says that they were made in "Germany-U.S. Zone"
Also hand painted, glass Le Chic buttons and these were made in Western Germany.
La Mode buttons.  Australia is written on the back of the card.
I think I need to make a dirndl just to embellish it with these little handpainted buttons.

Saturday, August 7, 2010

I Shutter to Think...

I am a chronic procrastinator.  I know things need to get done and I'll sit there and look at them for days, months and sometimes years, before I actually get around to doing what needs to be done.  Case in point:  my bathroom shutters.
They didn't have this large gaping hole when we moved into this place in January of 2009, but there was the tiniest of holes in the shutter curtain all the way to the left.  And then one day there was this larger hole and then a bigger hole in the next shutter over.   Hmmmmm...any idea what could cause this?

There's the culprit.  Mr. Parker, in his constant quest to escape from the best life a cat could ever have, had clawed his way through the hole.  Okay, so these curtains were pretty rotten to begin with and it did not take much to tear them.  In addition, the bathroom has no ventilation, so there were speckles of mold and one of the previous occupants had not removed the fabric at the last shutter painting party, so there were also  paint outlines on the edges.  They needed to be replaced.

But instead of fixing the problem, I would just dash into the shower and hope that no Peeping Toms were lurking outside to view my bits and pieces.  These curtains were still in tatters months after a friend came by and remarked that she was surprised that I had not fixed them given my inclinations toward craftiness.  But last night I ended the cycle and made some replacements.  I don't know why I waited so long, because the whole process took less than two hours.
I love them!  I used Swiss Dot Fabric from a yard sale (my usual place to buy fabric!).  And the next morning I woke up to this gorgeous glow in the bathroom.  It made me happy.

Friday, August 6, 2010

Pajama Party

I'm tired of wearing workout pants to bed at night (though they are comfy and convenient if one decides to just roll out of bed and go running).  I decided to make some pajamas.  I went through my fabric stash and evaluated them on their softness and girly floral patterns.
So I made these pajama bottoms from the Betz White Sewing Green "Lounge Pants" pattern.  Size L, of course, for a nice cozy fit through the hips and thighs.  The pattern is for a 29" inseam, which I do not have.  The pattern also suggests some cuffs in a contrasting hue, but for some reason my seams did not align, so I gave up on them.
They're pretty comfy so far.  I'm wearing them to bed tonight and if I like the way they feel, I have a few more soft fabrics lined up for some additional pairs.  Mr. Kitty has already given them his seal of approval...
I also decided to try making a nightie.  I had McCall's M5248 on hand, so I made a medium, the largest size my pattern offered.  My bottom half is not a medium, so I added a bit to the pattern to adjust to my personal measurements.  The bodice portion of the nightie turned out way too big, though I am sized correctly for a medium in that department.  I fixed that problem, but I still don't like the way it fits.  And besides, I don't like nighties anyway.  Halfway through the night the whole thing gets bunched up around my waist.  Useless!
Anyway, now that I am all outfitted with some new pajamas, who wants to come by for a sleepover?  We can play the Mystery Date Game and see which stud or bozo is behind that Mystery Door...