Monday, November 23, 2009

You're Never Too Old For Barbies!

Ever since I was a little girl, making Barbie clothes out of my brother's socks from the mending basket, I have been fascinated by Barbie clothes. The years passed and Barbie was put away, but when I was nineteen I got sick and was out of commission for a bit. I had two young nieces and decided to start making clothes for their Barbies.  When I had two girls of my own, I continued to make additions to their Barbie wardrobes. To the right, is a dress I made about 35 years ago. I used a fabulous  metallic gold shag fabric, which over the years and after many hours of play by my daughters, has become a bit ragged.

Now that the kids are grown and out of the house, boredom has brought me back to my first love: Barbie. Now that little fingers can't destroy my handiwork, I can make fancy evening dresses with tiny embellishments. Too bad my eyes have not kept up with my desire to do the fine sewing so deserving of Barbie.

I love to search the remnant piles of fabric stores. I choose fabrics that have glitz and glimmer or fine detailed feminine prints. Another fun thing I like to do is layer one color over a another to make a unique creation. Enjoy the fashion show!

First up, we have Merrie Olde Barbie:

This dress always makes me think of Little Women or a Dickens novel.  I love the fur cuffs and collar.  She is only missing a fur hat!

Next up, we have Mermaid's Ball Gown.  The shimmery fabric is reminiscent of peacocks, but I always think of this when I imagine a mermaid crawling out of the sea and attending a fancy dress ball.


And let's not forget the Winter Fantasy dress.  The flecks of silver in the deep purple velvet have Barbie waltzing at midnight among the snowflakes.


Next, we want to wish Barbie a Happy Valentine's Day in this red lame and black tulle vision.


And finally, Evening in a Rose Garden, displays purple lace over teal satin with a row of roses along the back seam.  Barbie is definitely ready for a  night of stolen kisses with Prince Charming in a moonlit garden.


I hope you enjoyed this fashion show as much as we have.  Don't be afraid to let your inner child loose when sewing!

Monday, November 16, 2009

When Hobbies Collide

I took up roller derby a few months back and had to put most of my sewing projects on hold as a result of this new obsession.  I'm trying to sew as much as possible now and some recent creations suffer from being overrun by derby:

The Derbrarian Bag
Derbrarian, def:  a portmanteau (word, not luggage) which combines derby and librarian.  Our very own Sewer Slut, Susan N, also joined roller derby with me and, for her birthday at the beginning of this month, I decided to make her a derbrarian bag. Using the skills learned from my embroidery class, along with the Roller Derby and Sexy Librarians (+ Secretaries) patterns from Sublime Stitching, I created the following two-sided bag for Susan N:

I also lined the bag with some blue corduroy to cover up the ugly inside stitches and to give the bag a little bit more structure.

The Injury Apron
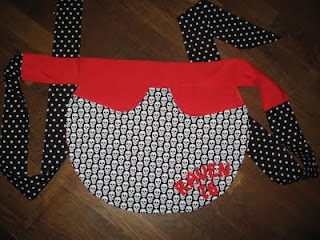
During a conversation with one of the players who had broken a leg during practice, we discovered that a solution to being confined to crutches or to one location in a house would be to wear an apron.  That way you can keep your phone, the remotes, a pen, your wallet, etc., all in one place without having to go search for them.  The apron has the added convenience of being attached to your waist, so that you do not have to deal with a purse or plastic bags attached to your crutches.    As a result of this conversation, I created the following personalized aprons for two injured players:


I think that Raven's name got lost a little bit with the busy skull print and I found that the red letters of Kiki's name didn't flow very well with the red bandanas on the pirate skulls, which is why I moved the letters to the waistband area.  The only downside with doing that, is that the reverse side of the apron is no longer pristine due to the red thread used to attach the letters.  Initially, I used Steam-a-Seam to attach the letters, but after multiple washings, I find that the letters on other projects just started to peel away from the fabric.  I wanted to secure the applique a little bit more, so I ran a blanket stitch all the way around the perimeter of the letters.

Raven's apron was delivered on Halloween in a post-surgery gift basket from the team. I'm a little late in delivering Kiki's apron, because she got her hard cast off last week, but she was on crutches yesterday, so hopefully she can still find it handy. I'll be delivering her apron later today!

Thursday, November 12, 2009

Tamer & Lion


I recently had a circus-themed party to attend and decided on the classic lion tamer and lion costume.  A lion was the only thing to which I could get Brian to agree.  It was, of course, not very original, because the party was rife with tamers and their animals, but instead of wearing the classic red, I went with blue, in part because it is our team color and also because I had a lot of blue yard-sale fabric sitting around.


For the Lion
I considered using the hood portion of a parka pattern, but after assembling that, I was really disappointed how it sat on the head.  The face was swallowed up by the hood.  Time was running out, so I just decided to sew a tube of fake fur and then I filled it with stuffing, and sewed some elastic between the two ends. I was still missing the beard part, because I had only made the tube long enough to reach the chin jaw line on both sides of the face. I cut out some approximation of a lion's beard and just hot glued it to the rest of the mane. I did sew and stuff some little ears and it was only after I had hot-glued them to the top of the mane that I realized I should have placed them closer to the face. As a result, I think the lion took on a wolf-like appearance. I also made a tail.  I sewed a long tube of flannel together and then sewed a little bit of the fake fur for the end.  To attach it to the belt I just made a little loop and put velcro on it.  None of the pictures show the tail, however, because Brian just looked too good in his vintage camel hair coat and the little tail was always hidden from view.  In addition, Brian thought the mane was too light of a color, so I took some brown fabric paint and some gold glitter glue and combed them through the fake fur.


For the Tamer
I used one of the classic slut-tastic Halloween patterns from Simplicity, specifically 3685, for which I probably paid $1.00 at one of those pattern super sales at JoAnn's. There were so many pieces to this jacket and I only had two nights to sew it up. I cut it out one night and then I sewed it together the next night. It probably took about three to four hours of non-stop sewing to put it together. I lined it with some silver fabric, which, once it was on, you could never see. I added some silver grommets and ribbon to tie it together. The only thing that I changed was the seam allowance on the arms. Fearing that my sausage arms would not fit into the sleeves, I reduced the seam allowance to 1/4". I wanted to make the vest, but ran out of time. I also wanted to bedazzle it with plastic crystals, but I also ran out of time.  As for the rest of the costume, I just wore a black feathered sweater tank and some booty shorts. Although I did not sew the hat, it was in need of some crafty magic.  They were only selling red, white, and gold hats down at the local lingerie store during their post-Halloween sale. I picked up a white one and took some mod-podge and reglittered it with silver glitter. I then took the selvedge from the blue fabric and hot glued a band of it all the way around the base of the top hat. I had also picked up a giant tickle-my-fancy blue feather at the lingerie store (because the craft store did not have the right colored plume) and I hot-glued that to the hat as well.

**Top photo courtsey of nocklebeast's Flickr page.

Wednesday, November 11, 2009

Doodle Embroidery Bag

In October I took a class at The Crafter's Studio in downtown Santa Cruz, CA.  It was a three-part class, with three classes each lasting three hours on Friday nights.  It turned out that there were only two of us who signed up:  me and my derby sister, Barbarian Librarian.

We started by doodling some ideas on paper and then transferring those doodles onto the front of our canvas bags with pencil.  I chose to do butterflies, because I am not an artist of any sort, and butterflies seemed like a pretty easy thing to sketch out.  Once I had two butterflies on my bag, I decided to add a dragon fly and a bumble bee.   As it turns out, I only ended up with the dragon fly.

Our instructor taught us a lot of simple stitches:  back stitch, stem stitch, split stitch, chain stitch, and the French knot.  I absolutely detested the chain stitch, because it just would not look like it was supposed to, so I ripped it out and gave up.  Our instructor also had a lot of books with samples of embroidery designs and stitches.  My favorite book, and the one I am considering adding to my collection of craft books, was called Stitch Sampler: The Ultimate Visual Dictionary to Over 200 Classic Stitches by Lucinda Ganderton.  The instructor also taught me the bullion stitch and the couching stitch, both of which were used to embellish my butterflies.

Along with the embroidery, the class also focused on how to construct an applique, which is something that I have been thinking of learning how to do for a while.  I chose to do a daisy that spanned both the front and back of the bag and attached it using the classic blanket stitch. After finishing up with the embroidery and the applique, we put a lining into the bag.  They had a serger at the Studio, so I actually serged the ends of my lining!  That was super exciting and it's too bad those sergers cost upwards of $1000!

So here is the final product:


And here are some close-ups of my butterflies.  The orange worm-looking stitch was the bullion stitch and the purple butterfly was made using a spiral couching stitch.


And finally, here is the back of the bag with the the other half of the daisy and the awesome snail fabric lining that they had at the Crafter's Studio:


I had a good time at this class and am considering some different classes for the future, but they don't involve sewing.  There's a jewelry making class where you learn soldering techniques...I hope we get one of those giant welding masks!  I am also considering a screen printing class and hopefully I can use those skills to make favors for next year's wedding.