Wednesday, July 22, 2009

Mysterious Lace Baffles Woman, Pets

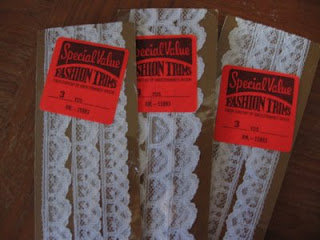
What does this look like to you?

Three small packages of lace? I'll give you that.

But what makes this lace unique? Do we have a never before seen woven pattern? Or perhaps this is a special silk lace used only in the most highly coveted couture fashions of the mid-20th century. Okay, well, I suppose we can scratch that as a possibility when calculating into the equation the traffic cone orange "Special Value" sticker... Well, let's hold on a minute. Maybe that Special Value sticker can help us figure out this whole thing. Who's in for a closer look at that sticker?

(Me! Me!)


Fiber content of undetermined origin? What does that mean? Where do you suppose this mysterious lace comes from? Should we be concerned? Should I, along with my pets, run to safety in my nuclear bunker? So many questions! Please help, Sewer Sluts, in revealing the enigmatic origins of this lace...

Thursday, July 16, 2009

The Naughty Librarian Dress

I have been meaning to make this pattern (Butterick 6582) for a while now. It's a retro repro from a 1960's pattern. I think I actually picked it up at a yard sale last summer and it has just been sitting in my pattern box waiting for the right fabric (and the motivation to make it!).

I chose to do View B (in blue). I did not have enough fabric to do View C (in yellow) and I really feel very anti-bow lately, so View A (in black) was also out. The problem with doing Views A or B instead of View C is the fact that I am a curvy girl. That means that my measurements for bust, waist, and hip are often out of sync with pattern measurements for a straight sheath dress. For this pattern, View B had one pattern piece for the front panel and one piece for the back panel, so I had to figure out a way to incorporate my body measurements onto the one pattern piece for each panel. The pattern I purchased was sized at 12-14-16. I went for the smallest size for the bodice, then I eased my marking pen to the middle size around the waist line, and then gradually marked a line to the largest size at the hip line. I cut the dress out of yard sale fabric, so it would not be too much of a financial setback to make a dress that absolutely did not fit.

There is quite a bit of interfacing used around the neck line. I do not know what possessed me to use heavyweight interfacing, but I did. This just means that the neck lines are a little stiffer than the rest of the dress. The directions called for quite a bit of understitching and I just could not recall the mechanics of that technique. (I think I've only used it once or twice on other dresses.) I just ended up topstitching the top seams of the bodice and the armpit holes to make up for my brain fart on understitching. I kept missing the directions to clip the curves because they just said "Trim" instead. Trim? Trim what? Curves, apparently. I also had some difficulty deciphering the directions on how to attach the shoulders of the front to the shoulders of the back. The simplest way to think of it is that you have to pin the parts with the interfacing together and then the parts with the fabric together and then sew one long line from one end to the other. (I had to read the directions a bunch of times before this made any sense.) The directions also said to put the zipper in right at the beginning. This made it difficult to sew the back facing onto the dress, because you had to open up the zipper to match and sew the seams. As for the hem, the dress was about four to five inches too long in its raw state. I ended up chopping off 3 inches and having about a one inch finished hem.

As it turned out, I did not err in my reasoning behind using all three sizes in one dress. I think the results are quite surprising and definitely accentuate the curves I spend so many hours lamenting. So here it is, the Naughty Librarian Dress:


Monday, July 13, 2009

BBQ Style


Not too long ago, I saw a photo of my friend Rachel (aka Bobinette) in the cutest summertime dress. I assumed that she had made it (and was right) and had to make one for myself! I love wearing a sleeveless, comfortable, cotton dress in summer. Especially when I'm just hanging out at a barbecue (which happens quite often at my house).


This dress was pretty easy to make and the pattern (Simplicity 2801 View D) was relatively straight-forward (those of us who sew from patterns know that they are never completely straight-forward!) I did the majority of it in one night and then finished it up the next morning in time to wear for a BBQ that afternoon.


I could have made this dress one whole size smaller, so it is a little sack-like on me. However, it
is extra comfortable with all that wiggle room! So comfy, that I don't think I'll take it in! There was one part of the pattern instructions that I did not like. The directions tell you to make the front band/facing (along the collar line) of the dress very early on, but to not to the back facing until the very end. I think they did this to account for hiding the zipper, but I found it very confusing and difficult to get the facings to line up correclty. If I were to do it again, I would do all of the top facing at the beginning and leave the ends open to sew after the zipper. If you decide to make this dress, you may want to study the pattern and decide for yourself how to approach it. I also had a little bit of trouble attaching the sleeve facings. I couldn't get them to line up with the armhole (surprise, surprise!) and with a little assistance, I learned my error was not leaving the bottom (pointy part) of the armhole undone a little so the facing could be eased in.


I wish I had a good picture of the front of this dress on a person, so you could get a better idea of what it looks like in total (the drawings on the front of the pattern package do not do it justice!) Perhaps Bobinette will post a picture of hers! ;)


Happy Summertime Sewing!


-Kricket

Monday, July 6, 2009

Fun Hats, I mean, Sun Hats

So, come September, I will be an aunt. Unfortunately I have just been idling away these last seven months by not making anything for my little nephew. That changed yesterday when I started making sunhats for the kid. He is going to need quite the collection as a new resident of sunny Orlando, Fl.

I chose to use the "Sprinkles Sunhat" pattern from Sweet Booties!: And Blankets, Bonnets, Bibs, & More by Valerie Van Arsdale Shrader (say that ten times in a row!). This book is filled with about thirty different baby/toddler patterns. The best part: it is not filled with things just for little girls. I cannot tell you how many times I have looked online and in stores for good baby boy patterns only to be bombarded with oodles and oodles of dresses for little girls. Whenever I open up to the baby section of a pattern book, it screams "Girls Only! No Boys Allowed!". Plus, I can feel the pink from the pages attempt to hypnotize me: "You will follow socially accepted gender norms!" My sister has refused to accept any boy things with sports or trucks. Instead, she is going for an animal theme.

I have only made the sunhat pattern from this book and I found it extremely Sewer Slut-friendly. After a minor hiccup on the first hat (sewing the inner edge of brim, when should have sewn the outer) and a minor hiccup on the last hat (missed one layer when basting four together), these four hats came together with relative ease. They are lined and the inner brim is finished with bias tape. I made one of each size (NB, S, M, L) and demonstrated, once again, incontrovertible proof that I have the smallest head in the universe (my head fit the medium size!). They do seem a little large for babies, but as I have no baby at hand to test this theory, I am going to go with my small head theory instead

I used mostly printed cottons for all of the hats except for the blue one, the outer layer of which is made out of corduroy with a red velvet ric-rac trim. I love the "Little Shark/Big Shark" fabric, so I was glad to see it take the form of something besides an apron, which is what I have been itching to make with it. The duck and bubbles fabric was a gift, so I was glad to put that to use as well. I have yet to add the chin ties with velcro closures, because I am fresh out of velcro.

So this marks the start of my baby(thing)-making craze. I still want to make bibs, diaper covers, burp cloths, and a diaper bag. If you have any suggestion for diaper bags, please let me know. I read one review of the one I've chosen, but the review was completely negative. The shower is in August. Wish me luck!

16th Century Venetian Courtesan with Flair

So we fantasize...as children we all have our "something". For me it was (and still is) "dress up". With a lifelong burning desire to have the ultimate gown I began researching. I started off in the wrong direction the keywords in my researching were failing to conjure up the images I had stored in my minds eye. I was thinking renaissance, medieval....not finding what I was looking for. I broke it down into centuries, and began Google image searches of 14th, 15th, 16th...

A ha!
16th century it is! So I began to get more specific...a region, a style..."Wait a minute...where am I going to wear this dress?!" I began to brainstorm....I looked at Ren Faires, nahw, I looked at the Jareth Ball up in LA....getting closer...Italy...baby, Italy! What about Carnavale?! I sent out the feelers to my lovely and he was actually into it! We booked a hotel and I began dreaming bigger. Venezia...It was meant to be, before all of this I knew the gown would be red. Why? You ask, I still don't know. Lets say, it came to me in my dreams. Turns out the colour of Venezia is red. Now that the dress has an ultimate purpose, Venice, Red, Carnavale...The ideas are coming together...a combination made in heaven.
So that evening that we decided to "do this" I went over to my friend J's house and threw the idea out to her and her husband after several glasses of vino. They booked their hotel that night and we started shopping for patterns online!!!
So the two pictures above combined the major elements I was looking for, but no one image did my imagination justice, so the improvisations and customizations just keep on coming. With no "one" dress how am I to find a pattern? We bought many, many patterns and have been piecing them togther, using instructions for the waistband then making the skirt as we please...it is a collaborative process. We found an online corset pattern generator and started there...we found an "onion peel diagram" of what layers we would actually need... now we can begin sewing! First we made the smock (in Venice at that time it was called a "camica") and a corset.
So round one corset needed a few alterations, a slightly higher rise in front and a little more room on the back top half of the lacing area. In an effort to save money where we can we decided to use massive zip ties as the boning, as we found out boning is super expensive when the zip ties work just as well. I was determined that I would only make two corsets for my "bodies"as they are called in antiquity. J made 5 prototypes before she was happy...I just don't have that kind of patience.
Round two went well, no more adjustments needed. I learned however that binding is a bad idea with such closely spaced tabs. I had a really hard time with that!
So at this point I had had it with underpinnings! I wanted some voluptuous fabric! Big Skirts! The little girl inside me who wants this costume is getting impatient! So onto big skirts :)
I had bought in the very begining of this whole ordeal 9 yards of dark red heavy satin. I saw it, and I knew it was right for the job. I took all nine yards and prepped it for cartridge pleating.

So I spent one whole weekend prepping and pleating. The process is ridiculously simple. You take your fabric and fold over about 2 in, press and pin, then make your mark. Every inch make a set of three 1" lines 1/2" apart, starting 1/4" down from the fold. Then get your big ass upholstry needle out and stitch a long (as long as your material) thread through every 1" line. When you are done, draw it up and you are ready to attach to waistband. Every pleat needs to be whipstitched to the waistband twice with heavy duty thread.

In order to have the skirt sit properly you need a bumroll, so I made a bumroll. Two cresent shaped pieces of fabric stitched together. Usually you can use polyfill for the stuffing (which is supposed to be according to the pattern "firmness of a ripe tomatoe") but J had some leftover Alpaca fiber from her herd so we used that as stuffing instead.

Showing off my "bum".
I have now progressed to the second skirt a vision in gold and red brocade. same process as mentioned above.

Progress continues to the bodice next and then onto sleeves! I am making the two forparts tonight. Will continue posting progress! Let me know if there is any info about patterns etc. you would like me to scan and post. Thanks for reading.
Saturday, July 4, 2009

Sundress Undress

To answer your first question: No, there is no water in this watering can. It's a prop. Get used to it.

To answer your second question: This dress was made with Simplicity #3745 View B (minus dorky front bow).

I've had this dress cut out and sitting in pieces for about two weeks now and finally decided to spend a few hours putting it together. Both fabrics were found by my mother at yard sales in North Carolina. The floral one gives off a slight vintage aroma when ironed or wet, but it was just too funk-a-licious to remain folded up in my fabric stash.

I liked the way this dress looked in the pattern sketches, but not so much on the models. The modeled dresses seem to be made out of a stiff cotton, so I thought that a more lightweight fabric would work a little better with this pattern. I'm mildly pleased with the results. I think the dress looks great from the front, but from the side I look a bit preggers; it just balloons out over my stomach and butt.

I have mixed feelings on the bodice. I like that it is lined (the skirt is not), but I feel like it squishes my boobs just a tad (maybe I needed to go with the bigger size?). I tried it without a bra and it was Sag City, U.S.A. In addition, the placement of the straps is just a fraction off. I would have placed them right at the top points of the bodice, because they seem to buckle a bit in their current position.

Otherwise, this was really easy to sew. The pleats on the skirt look really good. It's comfortable and the length did not need any adjustments. It also looks cute with a little white shrug. And on the plus side, this piece doubles as maternity wear if I ever have a parasite in my womb.

Thursday, July 2, 2009

Pattern Poop: The Emmeline Apron

The Emmeline Apron from Sew Liberated (formerly Montessori by Hand) has been lurking in my pattern stash for over a year. I bought it because it was so different from the McCall's, Simplicity, and KwikSew apron patterns. The Emmeline Apron, like their website proclaims, is modern and stylish, which is what drew my attention to it in the first place, but because it is reversible and requires 3-1/4 yards of fabric, I really needed a reason to sew it up.

I finally found a reason in the form of a wedding gift. Not only does the bride enjoy baking and making a mean plate of spaghetti and meatballs, but on the night of their engagement, she thought the "present" he had promised was an apron to thank her for making a lovely meal. Instead, he went down on bended knee and produced a ring. (Oh stop your sniffling!) I'm still not sure if she ever got that apron, so I'm sending her this one:

I'm really pleased with the way it turned out. The apron is very flattering with a gathered bust and darts below the bodice band. The pattern did not have directions for pockets, so I did not bother with them. I really liked that I had to topstitch around the entire skirt. I find that reversible aprons just look better with topstitching, especially after a toss in the wash. Part of the reason the pattern calls for so much fabric is that you have to make your own bias strips for the neck ties. This was my first experience with DIY bias strips and it was surprisingly easy. The directions want you to mostly hand sew them onto the bodice. I tried so hard to avoid that, but I just could not get a proper seam and I ended up taking out the stitches to just hand sew the bottom of the neck strap to the bodice band. My first attempt looks like crap, but at least the other side turned out okay.

While I like that the straps at the waist are so long that you can tie them in front, I found that actually having a pattern piece for this was a waste of paper. The package provides two large pieces of (non-recycled) paper with the patterns on them. One piece has the bodice and the skirt. The other piece has the two bodice bands and the waist straps separated into two pieces which you then have to tape together. I really think the two bodice bands would have fit on the first piece of paper and dimensions should have been given for the waist straps to be cut out without a pattern. And here's another thing about the paper that they used for the pattern pieces: it was really stiff and heavy. This made it really difficult to fold to get the lines for the darts. On my first attempt I had to sew the darts two times in order to get the edges of the skirt top to match the edges of the bottom bodice band.

The hand sewing and the wasteful attitude toward paper were the only two problems I had with the Emmeline pattern. It's cute and it's flattering, so if you want to spend $30 or more in fabric and $12 for a reversible apron pattern, this may be a good choice for you. Oh, yeah, well I guess I also did not like how much this whole thing costs. Like I said earlier, I really needed a reason to sew this up.